
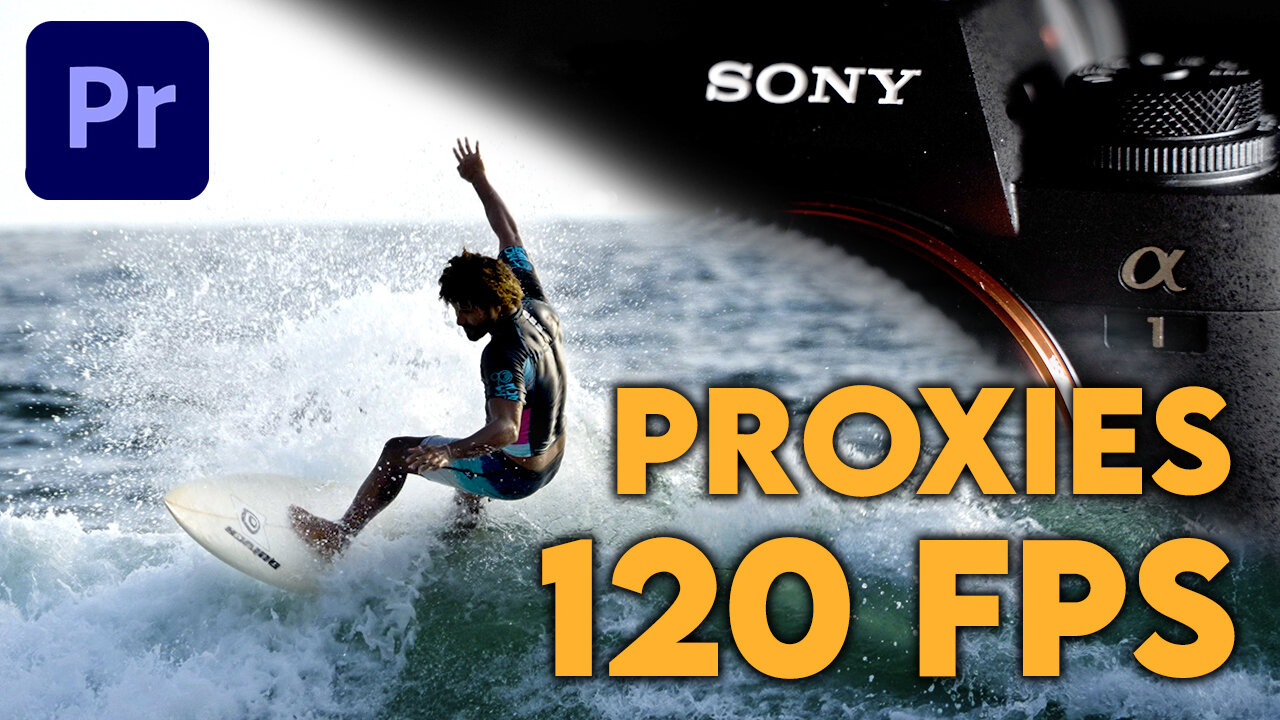
How to create proxies for 120fps footage - Shutter Encoder Software
Maybe you bought a new Sony A1, Sony A7S 3, or any other high frame shooting camera? You want to start editing, but your device slows down, and you have to convert the 120fps clips in proxies in Premiere Pro. But wait, why can Premiere Pro only create a maximum of 60fps proxies?
Currently, Adobe Premiere Pro can not convert higher the 60fps proxies. For your 4K, 120 frames per second footage, you have to use a third-party app could Shutter Encoder, where you can create 120 frames per second proxies. I show you my whole workflow and how I convert my 120fps footage.
As I bought the new SONY A1, I was so excited and filmed many 8K and 4K 120fps clips. After importing in Premiere Pro, I saw quickly my MacBook Pro 16” could play the 4K 120fps footage, and as I created proxies, the files were jumpy, and oh grab, all the proxies were only 60fps.
After some google search and a youtube video, I found a solution and improved the whole workflow. So that’s why I share this with you, and you also can check out my Youtube Video.
Table of Contents:
How do I create 120 FPS Proxies?
The solution is SHUTTER ENCODER. This tool can save quite a lot, but we are focusing on creating proxies for now.
I will share my software setting preset + Proxy logo so that your workflow will be smooth and you can edit your high-framed footage quickly.

How to slow down the 120 FPS footage to a 24 FPS timeline?
Frame rate Calculator

I use the Speed/Duration option in the Project panel. After highlighting the clips with the 120FPS, you do a right-click, then click on Speed/Duration and type in 19.98%. This will be for a 23,976 timeline, so to figure out the percent % for the different framerates you use, check out this Online Framerate Calculator. You have two options now.

Option One
only converts the 120 frames per second clips with the shutter encoder. But one problem I've faced because I have filmed in different frame rates.
How do I find the 120 FPS clips without searching via Premiere clip buy clip?
Here is how I do it. Get the SONY CATALYST BROWSE which is free, and you also could stabilize your footage with it. Insane powerful tool.


You have to load your clips there and click on the frame rate to sort the frame rates from high to low. So you will see the 120 FPS clips at first. Then mark all the 120 FPS clips right-click, and choose “Show in Finder.” Now, look at this. The Finder will open and select all the files with 120FPS, then copy the files in a new folder or copy them into the Shutter Encoder.
It's not possible to drag and drop the selected files into the software. That’s why I created a 120FPS folder with the clips.
Option two: Shutter Encoder App
Go to the Shutter Encoder App, click “BROWSE,” and import all the files in the 120FPS folder.

2 THINGS YOU HAVE TO DO!!!
1st. Click the Settings icon and choose “Replace suffix by“ and type _Proxy. This is that Shutter Encoder rename your files and add this at the end of your imported file. It’s because premiere pro can read it automatically, and you don’t have to attach file by file the proxies.
2nd. DOWNLOAD MY Shutter Encoder preset setting with the proxy logo as well. There is also a .alias folder that links to the folder where you have to copy my preset or check the video on youtube.
Once you import the files, click the Star ⭐️ Icon and choose “MK-PROXY-Watermark” then a window will pop up where you go back into the folder and choose the files “PROXY_Logo_1280x720.png“ make sure the size set on 300% for the watermark! DONE!
Press the “START FUNCTION“ to start creating the proxy files.


That's actually all. The settings I have changed in Shutter Encoder are.

Shutter Encoder changes
Choose Function:
Apple ProRes + Type: Proxy
Image:
Scale: 1280x720 —> Adapt
Overlay:
Add Image (Proxy Watermark PNG) Size on 300%
Colorimetry: (For LOG Footage)
Convert levels: 16-235 -> 0-255
Choose your output folder. I recommend creating a folder where all your video footage is. Name it “Proxies“ the reason is so that Adobe Premiere Pro is reading the proxies. Mark all your files in Premiere Pro, then go to Proxie -> Attach Proxie and go to the created proxies folder with all your converted proxies.
Option two literally creates all your proxies with the program. Keep in mind it will take a little bit longer with Shutter Encoder to create your proxies.
After attaching the proxies toggle on the proxies so you can fluently edit your 4K 120fps footage.
At next you have to slow down your footage from 120FPS if you are using a 23,976 FPS timeline. You have to slow it down to 19.98% by selecting the 120FPS clips and choose Speed/Duration. Again here you can check which procent you need if you use a 30FPS timeline or you want to use a 60FPS timeline for maybe stockfootage.
Online Framerate Calculator
If you have any question feel free to reach out to me or write a comment down below. Fell free to SHARE THIS POST or my YOUTUBE VIDEO. to your friends. THANKS 👏🏻
👉 📞 Book A Free Strategy Call
👉 📲 Send Me A WhatsApp
** These are affiliate links you can use to both support my work and save money,
so it's win-win for both of us. Thank you! ❤️ **
My Equipment I use: 🛒 GEAR LIST: ► https://kit.co/MaikKleinert
ALL-IN-ONE Platform:
Course hosting, Marketing & DM Automation:
Course Creator 360 (CC360): ►Course hosting, marketing & automation.
Course Creator Pro: ► How to create an Online Course.
YouTube tools:
🤖 VidIQ – AI‑Powered YouTube Growth 🚀
🔴 Tubebuddy: YouTube Research tool
Video Editing Tools for Creators:
🎨 DeHancer - 10% OFF code "MAIK" Film emulation,Filmlook,Grain,Halation,Bloom
🖥 MotionVFX Motion graphic plugin for Davinci Resolve, Premiere…
🎶 ARTLIST Music & SFX licensing
📚 | BEST ONLINE COURSES I CAN RECOMMEND TO YOU 🎬
📹 | KOLDER CREATIVE Sam Kolder's Online Course - Cinematic Film & advanced video editing
Productivity & Learning tools:
Speechify ► helps ADHD individuals read as an audio a book, websites, blogs, and emails."


Mail
Facebook
LinkedIn
X
Pinterest
Reddit
Snapchat